Mantels are a beautiful way to add character and style to any room in your home. And one of the best ways to dress up a mantel is by covering it with wood. In this post, you’ll learn how to cover a mantel with wood so that you can achieve a polished and professional look.
Mantels make a beautiful addition to any home, but they can be quite expensive. If you’re on a budget or just want to add some unique character to your mantel, consider covering it with wood. It’s a simple project that can be completed in a day and will give your fireplace a rustic look. So without further ado, here’s how to cover a mantel with wood.
Summary: Wood is a natural material that can be used to cover mantels and other wall areas. There are a few different ways to do this, depending on the wood’s grain and how much detail you want to include.

Why Covering a Mantel With Wood is a Great Idea?
There are many reasons why you might want to cover your mantel with wood.
1. Add a Rustic Touch Home
If you want to add a rustic touch to your home, then covering your mantel with wood is a great way to do it. So it can be a great way to give your home a makeover.
2. It Can Be Easier Than You Think
Covering a mantel with wood can be easier than you think. You don’t have to be a professional carpenter or anything like that. All you need is some basic woodworking skills and the right tools. So if you’re looking for a way to add a rustic touch to your home, then covering your mantel with wood is a great option.
3. It’s Inexpensive
Another reason why you might want to cover your mantel with wood is that it’s relatively inexpensive. So if you’re on a budget, then this is a great option for you.
4. You Can Do It Yourself
If you’re the DIY type, then you’ll be happy to know that covering your mantel with wood is a relatively easy project that you can do yourself. So if you’re looking for a weekend project, then this is a great option for you.
5. Adds Value to Your Home
If you’re looking for a way to add value to your home, then covering your mantel with wood is a great option. So if you ever decide to sell your home, you can expect to get a higher price for it.
These are just a few of the reasons why you might want to cover your mantel with wood. So if you’re looking for a way to add a rustic touch to your home, then this is a great option for you.

Things You Will Need to Cover a Mantel With Wood
- Tape measure
- Plywood
- Circular saw
- High-grit sandpaper
- Stain (optional)
- Polyurethane (optional)
- Carpenter’s glue
- 1×2 lumber
- Nail gun and nails
- Cordless drill
How to Cover a Mantel With Wood in 6 Steps
If your mantel is looking a little bare, you may be considering adding some decorations. But before you start shopping for holiday decorations, take a look at this guide on how to cover your mantel with wood. With just a few supplies and a little bit of time, you can transform your mantel into a beautiful focal point in your home. Here are the steps:
Step 1: Choose Your Wood
Select either real wood or faux wood. If you opt for real wood, make sure it is kiln-dried and of the appropriate thickness. If you choose faux wood, make sure it is made of durable polyurethane. So be careful not to select a material that is too flimsy.
Step 2: Cut the Wood to Size.
Use a saw to cut the wood to size. If you’re using natural wood, you may want to use a power saw for this step. Make sure the cuts are clean and straight. Make sure the wood is the right size for your mantel.
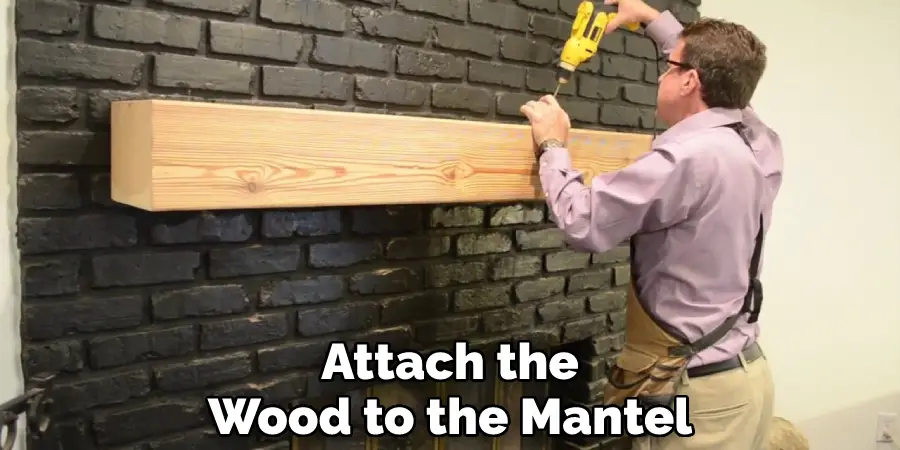
Step 3: Attach the Wood to the Mantel
Use screws or nails to attach the wood to the mantel. Make sure the wood is securely attached. This step can be a little bit tricky, so take your time and be careful. And also, make sure that the screws or nails you use are not too long, or they will come out the other side of the mantel and ruin the look.

Step 4: Hang Your Stockings
Now that your wood is attached, you can hang your stockings! This is the fun part. Get creative with how you arrange your stockings. You can put them in a straight line, or you can arrange them more creatively. Just make sure that they are all securely attached so they don’t fall.
Step 5: Finish the Edges
If you want a more polished look, you can finish the edges of your wood mantel cover with trim. You can use any type of trim that you like, but we suggest using something that compliments the style of your home. For example, if you have a rustic farmhouse mantel, you could use some simple pine trim.
Step 6: Add Your Decorations
Now it’s time to decorate your mantel! You can use whatever you like to make it festive and personal. Some ideas include garlands, stockings, lights, candles, and holiday figurines. Arrange everything how you like it and enjoy your beautiful, unique mantel display!
Get creative and have fun! Your mantel is the perfect place to show off your holiday spirit.
Some Essential Tips You Must Know While Covering a Mantel With Wood
1. Drill Pilot Holes First
This will help avoid the splitting of wood while screwing it. Also, make sure to use the appropriate drill bit size. Make sure the hole is slightly smaller than the screw.
2. Be Careful With the Direction of the Grain
When you are attaching the strips of wood, be careful to place them in the same direction as the grain on the mantel. This will help to avoid any cracking or splitting that may occur.
3. Use a Good Quality Wood Glue
This is essential to ensure that the wood strips stay securely attached to the mantel. You should also use clamps to hold the strips in place while the glue dries.

4. Use Finishing Nails for a More Permanent Attachment
If you want the wood strips to be more securely attached, you can use finishing nails. Just be sure to use a nail gun so that you don’t split the wood.
5. Use a Good Quality Wood Stain or Sealer
This will help to protect the wood and keep it looking its best. Make sure to follow the directions on the can carefully. Otherwise, you may end up with a streaky or uneven finish.
6. Use a Level
Keep checking if the wood is level or not by using a spirit or laser level. This is important because an uneven surface can create gaps between the wood strips.
7. Let the Wood Dry Completely Before Using It
Make sure to let the wood dry completely before using it. This will help to avoid any warping or damage that may occur.
Frequently Asked Questions
What is the Best Wood to Use for a Fireplace Mantel?
When it comes to choosing the best wood for your fireplace mantel, there are a few things you’ll want to keep in mind. The most important factor is probably going to be the look you’re hoping to achieve. Different woods can create very different aesthetics. For a more natural look, you might choose rustic wood like reclaimed barn wood or driftwood. For a more polished look, you might opt for something like cherry or mahogany.
Can You Cover an Existing Fireplace Mantel?
Yes, you can cover an existing fireplace mantel. This can be a great way to give your mantel a whole new look without having to replace it entirely. Keep in mind, though, that you’ll want to make sure the surface of your mantel is smooth before you begin. If it’s not, you may want to sand it down or apply a layer of primer before you get started.
How Thick Should a Wood Mantel Be?
The thickness of your wood mantel will largely depend on the look you’re going for. If you want a more rustic mantel, a thicker piece of wood will probably work better. If you’re going for a more polished look, you might want to choose a thinner piece of wood. Ultimately, it’s up to you!

Conclusion
As you can see, it is not difficult to cover a mantel with wood. With a few tools and some patience, you can have a beautiful mantle that will last for years. If you take your time and measure twice, you should have no problems at all.
Now that you know how to cover a mantel with wood, what will you do next? Will you tackle the project yourself or hire a professional? Whatever you decide, we hope this article has been helpful. Don’t forget to measure twice and cut once! And if you need any more help, be sure to reach out to one of our experts.
You Can Check It Out To Hang a Cabinet With One Stud

